Verify Domain in Google Search Console
Why Verify Your Domain in Google Search Console?
Google Search Console (GSC) is a free tool that helps you monitor and improve your website's presence in Google Search results. Before you can use it, you need to prove you own the domain.
Benefits of verification:
- 📊 Monitor search traffic and performance
- 🗺️ Submit sitemaps for better indexing
- 🐛 Identify and fix crawl errors
- 📱 Check mobile usability issues
- 🔒 Get security alerts for hacked content
- 📈 See which keywords bring traffic
Verifying your domain in Google Search Console is essential for any website owner who wants to improve their SEO and understand how Google sees their site.
Prerequisites
Before you start, make sure you have:
- ✅ Domain assigned to your Web Control Panel
- ✅ Google account (Gmail)
- ✅ Access to DNS Management
Verification Methods
Google Search Console offers two reliable DNS-based verification methods. Both work equally well for WebHostMost users.
Method 1: DNS TXT Record Verification (⭐ Recommended)
This is the most popular method for WebHostMost users because:
- ✅ Verifies ALL subdomains automatically
- ✅ No HTML file uploads needed
- ✅ Permanent verification (doesn't expire)
- ✅ Works even if website is down
- ✅ Simple single-line record
Step 1: Start Verification in Google Search Console
- Go to Google Search Console
- If this is your first time, you'll see a welcome screen:
- "Welcome to Google Search Console"
- "To start, select property type"
- Choose "Domain" (left option)
- This verifies ALL URLs across all subdomains and protocols
- Enter your domain:
yourdomain.com(without https://) - Click "Continue"
If you already have domains in GSC:
- Click "Add property" in the top-left dropdown
- Select "Domain" option
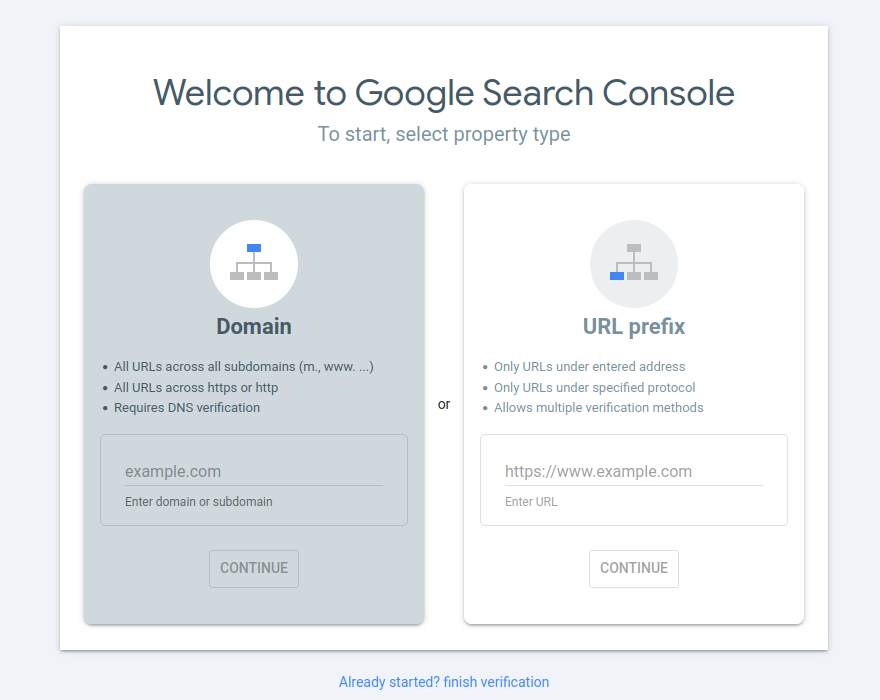
Always choose "Domain" property type, NOT "URL prefix". Domain verification covers all subdomains (m, www) and protocols (http/https) automatically with DNS verification.
Step 2: Copy the TXT Verification Code
Google will show you a verification code that looks like this:
google-site-verification=ABC123xyz456-EXAMPLE-CODE
Copy this entire code - you'll need it in the next step.
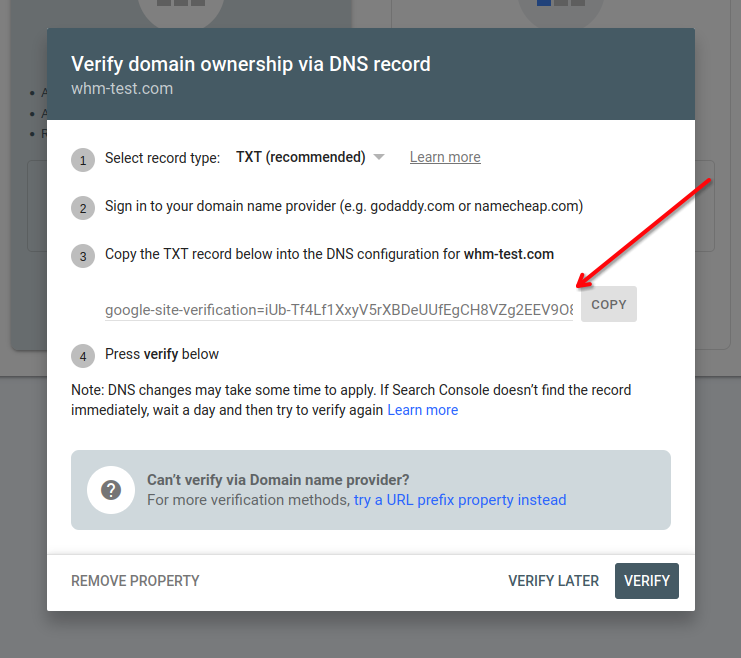
Don't close the Google Search Console window yet! Keep it open while you add the TXT record.
Step 3: Add TXT Record in WebHostMost
-
Login to Web Control Panel:
- Option 1: Via Client Area → Click "Login to Control Panel" button next to your service
- Option 2: Direct login at
https://serverX.webhostmost.com:2222/evo/login(replace X with your server number from email)
-
Go to DNS Management:
- Click Domain Management in the sidebar
- Click DNS Management
- Find your domain in the list
-
Add TXT Record:
- Click "Add Record" button
- Select "TXT" from the record type dropdown
- Fill in the fields:
Field Value Name Leave empty (or enter @)TTL Keep default (3600) TXT Record Type Select "Plain" Value Paste the Google verification code -
Save the record:
- Click "Save" button
- Wait for confirmation message
Learn more about managing TXT records in our DNS Management guide.
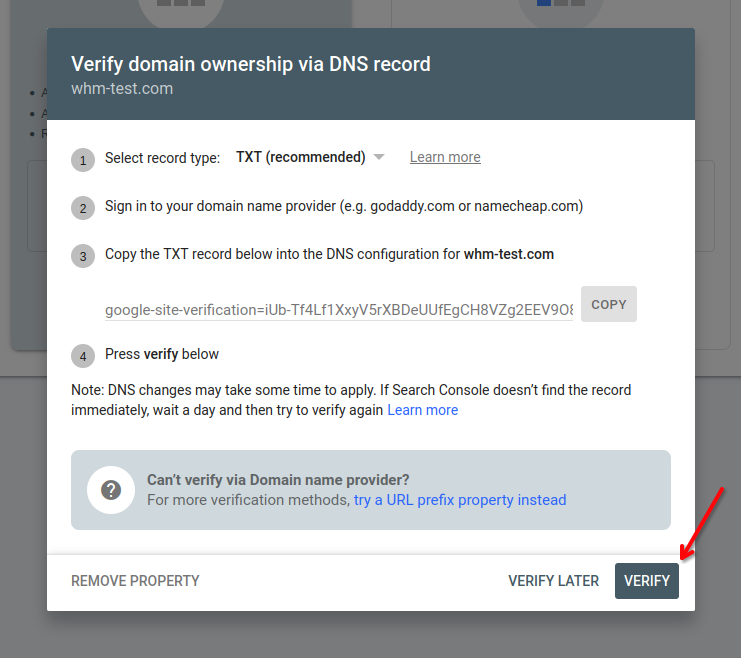
Step 4: Verify in Google Search Console
- Return to the Google Search Console window
- Click "Verify" button
- Wait a few seconds for verification
If successful: ✅ You'll see "Ownership verified" message!
If failed: ⏳ Wait 5-10 minutes for DNS propagation, then click "Verify" again.
Method 2: DNS CNAME Record Verification (⭐ Alternative)
Some users prefer CNAME records. This method is equally reliable as TXT.
Why choose CNAME:
- ✅ Same benefits as TXT method
- ✅ Verifies all subdomains
- ✅ Permanent verification
- ✅ Some find it easier to manage
Steps for CNAME Verification:
- Start in Google Search Console:
- Select "Domain" property type
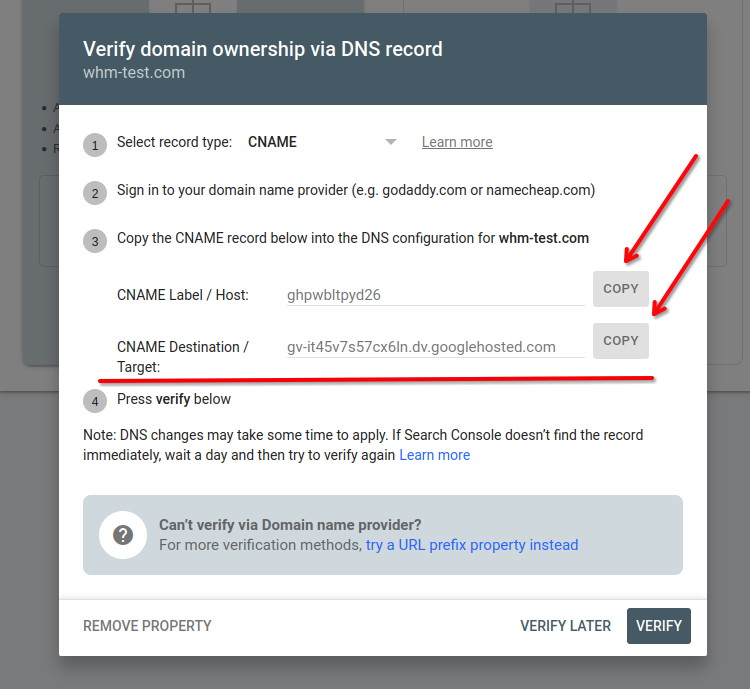
- In the verification screen, find "Select record type" dropdown
- Choose "CNAME record" instead of TXT
- Copy the CNAME record details Google provides:
- Name: Usually something like
abcd1234 - Value:
gv-XXXXXXXXX.dv.googlehosted.com
- Name: Usually something like
-
Add CNAME in Web Control Panel:
- Go to Domain Management → DNS Management
- Click "Add Record"
- Select "CNAME" type
- Name: Enter the name Google provided (e.g.,
abcd1234) - Value: Enter the target (e.g.,
gv-XXXXXXXXX.dv.googlehosted.com) - TTL: Keep default (3600)
- Click "Save"
-
Verify:
- Return to Google Search Console
- Click "Verify"
Both TXT and CNAME methods work the same - choose whichever you prefer. Most users pick TXT because it's slightly simpler.
Alternative Verification Methods
If you cannot use DNS verification for some reason, Google offers non-DNS alternatives. These are not recommended for WebHostMost users but available if needed.
HTML Meta Tag (Single URL Only)
This method only verifies one specific URL, not your entire domain.
When to use:
- You only need to verify
www.yourdomain.com(not other subdomains) - You cannot access DNS settings
- You have easy access to edit your HTML files
Steps:
- In Google Search Console, choose "URL prefix" property type (not Domain)
- Enter full URL:
https://www.yourdomain.com - Select "HTML tag" verification method
- Copy the meta tag code
- Add it to your website's
<head>section before</head> - Click "Verify" in Google
Example:
<head>
  <meta name="google-site-verification" content="YOUR-CODE-HERE" />
  <!-- Rest of your head content -->
</head>
This method only verifies the specific URL you entered. If you need to track example.com and www.example.com separately, you'll need to verify each. Use DNS methods (TXT or CNAME) for full domain coverage.
Troubleshooting
❌ "Verification failed" Error
Possible causes:
-
DNS not propagated yet
- Solution: Wait 10-30 minutes, then try again
- Check DNS propagation: dnschecker.org
-
Incorrect TXT record format
- Solution: Make sure you copied the ENTIRE code including
google-site-verification= - No extra spaces or line breaks
- Solution: Make sure you copied the ENTIRE code including
-
Wrong domain/subdomain
- Solution: Verify the exact domain you entered in GSC matches the one in DNS
❌ "TXT record not found"
Check these:
- ✅ Name field is empty or contains only
@ - ✅ Record type is TXT, not CNAME or A
- ✅ Plain type selected (not DKIM or SPF)
- ✅ Record was saved successfully
How to check if TXT record exists:
Use online DNS checker:
- Go to dnschecker.org/txt-lookup.html
- Enter your domain
- Look for the
google-site-verificationrecord in results from different locations
⏱️ "Verification timeout"
If verification takes too long:
- Clear your browser cache
- Try in incognito/private mode
- Wait 1 hour for full DNS propagation
- Try verification again
What to Do After Verification
Congratulations! Your domain is now verified. The next essential step is submitting your sitemap to Google.
Submit Your Sitemap to Google Search Console
A sitemap helps Google discover and index all your pages faster. This is highly recommended after verification.
Where to Find Your Sitemap:
WordPress:
- Auto-generated at:
https://yourdomain.com/wp-sitemap.xml(WordPress 5.5+) - Or use SEO plugins: Yoast SEO, Rank Math, All in One SEO
- Plugin sitemaps usually at:
https://yourdomain.com/sitemap.xml
Other CMS:
- Joomla: Extensions like OSMap or JSitemap
- Laravel: Package
spatie/laravel-sitemap - Next.js: Package
next-sitemap
Static HTML/CSS sites:
- Use online generators: xml-sitemaps.com
- Or create manually for small sites
- Upload
sitemap.xmlto website root
Don't have a sitemap yet? No problem! You can add it later. Google will still crawl your site, but a sitemap speeds up the process.
How to Submit in Google Search Console:
- In Google Search Console, go to "Sitemaps" (left sidebar)
- In the "Add a new sitemap" field, enter the full URL of your sitemap:
- Example:
https://yourdomain.com/sitemap.xml - WordPress:
https://yourdomain.com/wp-sitemap.xml - Custom path:
https://yourdomain.com/path/to/sitemap.xml
- Example:
- Click "Submit"
- Wait a few minutes - status will change to "Success"
Example:
Add a new sitemap: https://yourdomain.com/sitemap.xml
                   [Submit]
After submission, you'll see:
- ✅ Discovered URLs - how many pages Google found
- 📊 Status - whether sitemap is valid
- 📅 Last read - when Google last checked it
When will I see results? It takes time for Google to process your sitemap:
- Sitemap read: Usually within 24 hours
- Pages indexed: 2-7 days for new sites, faster for established domains
- Search Console data: First statistics appear after 2-3 days of having indexed pages
- Search ranking: Can take weeks or months depending on competition
Be patient - this is normal! Check back in a few days to see progress.
Monitor Your Site in Google Search Console
Now that your domain is verified and sitemap submitted, use these GSC features:
1. URL Inspection Tool
- Check if specific pages are indexed
- Request indexing for new pages
- See how Google crawls your pages
2. Performance Reports
- Track search traffic and clicks
- See which keywords bring visitors
- Monitor impressions and CTR
3. Index Coverage
- See which pages are indexed
- Identify crawl errors
- Fix indexing issues
4. Email Alerts
- Click ⚙️ Settings (top-right)
- Go to "Email notifications"
- Enable alerts for indexing issues, security problems, manual actions
Check Google Search Console weekly to monitor your site's performance and catch any issues early.
Frequently Asked Questions
How long does verification take?
Usually instant if DNS has propagated. If not verified immediately, wait 10-30 minutes and try again. DNS propagation can take up to 48 hours in rare cases.
Can I remove the TXT record after verification?
No! Keep the TXT record in place. If you remove it, you'll lose verification and need to verify again. The record is tiny and doesn't affect your site.
Do I need to verify subdomains separately?
No! Domain property verification (DNS TXT method) automatically verifies ALL subdomains:
www.yourdomain.comblog.yourdomain.comshop.yourdomain.com- etc.
I have multiple websites on different domains. Do I verify each?
Yes, you need to verify each domain separately. But you can add unlimited properties to one Google account.
Can multiple people verify the same domain?
Yes! Multiple Google accounts can verify and access the same domain in Search Console. Good for teams.
What if I change hosting providers?
Verification stays valid as long as the TXT record remains in DNS. When migrating:
- Keep the same TXT record at new host
- No need to re-verify
- Data in GSC is preserved
Related Documentation
- DNS Record Management - Learn about all DNS record types
- Managing TXT Records - Detailed TXT record guide
- Assign Domain to Web Control Panel - Set up your domain first
Need Help?
Can't verify your domain? Our AI assistant Webbee can help!
💬 Ask Webbee:
- "Help me verify my domain in Google Search Console"
- "Why can't I add TXT record?"
- "How to check if my DNS record is correct?"
Or contact our support team 24/7 - we're here to help! 🚀